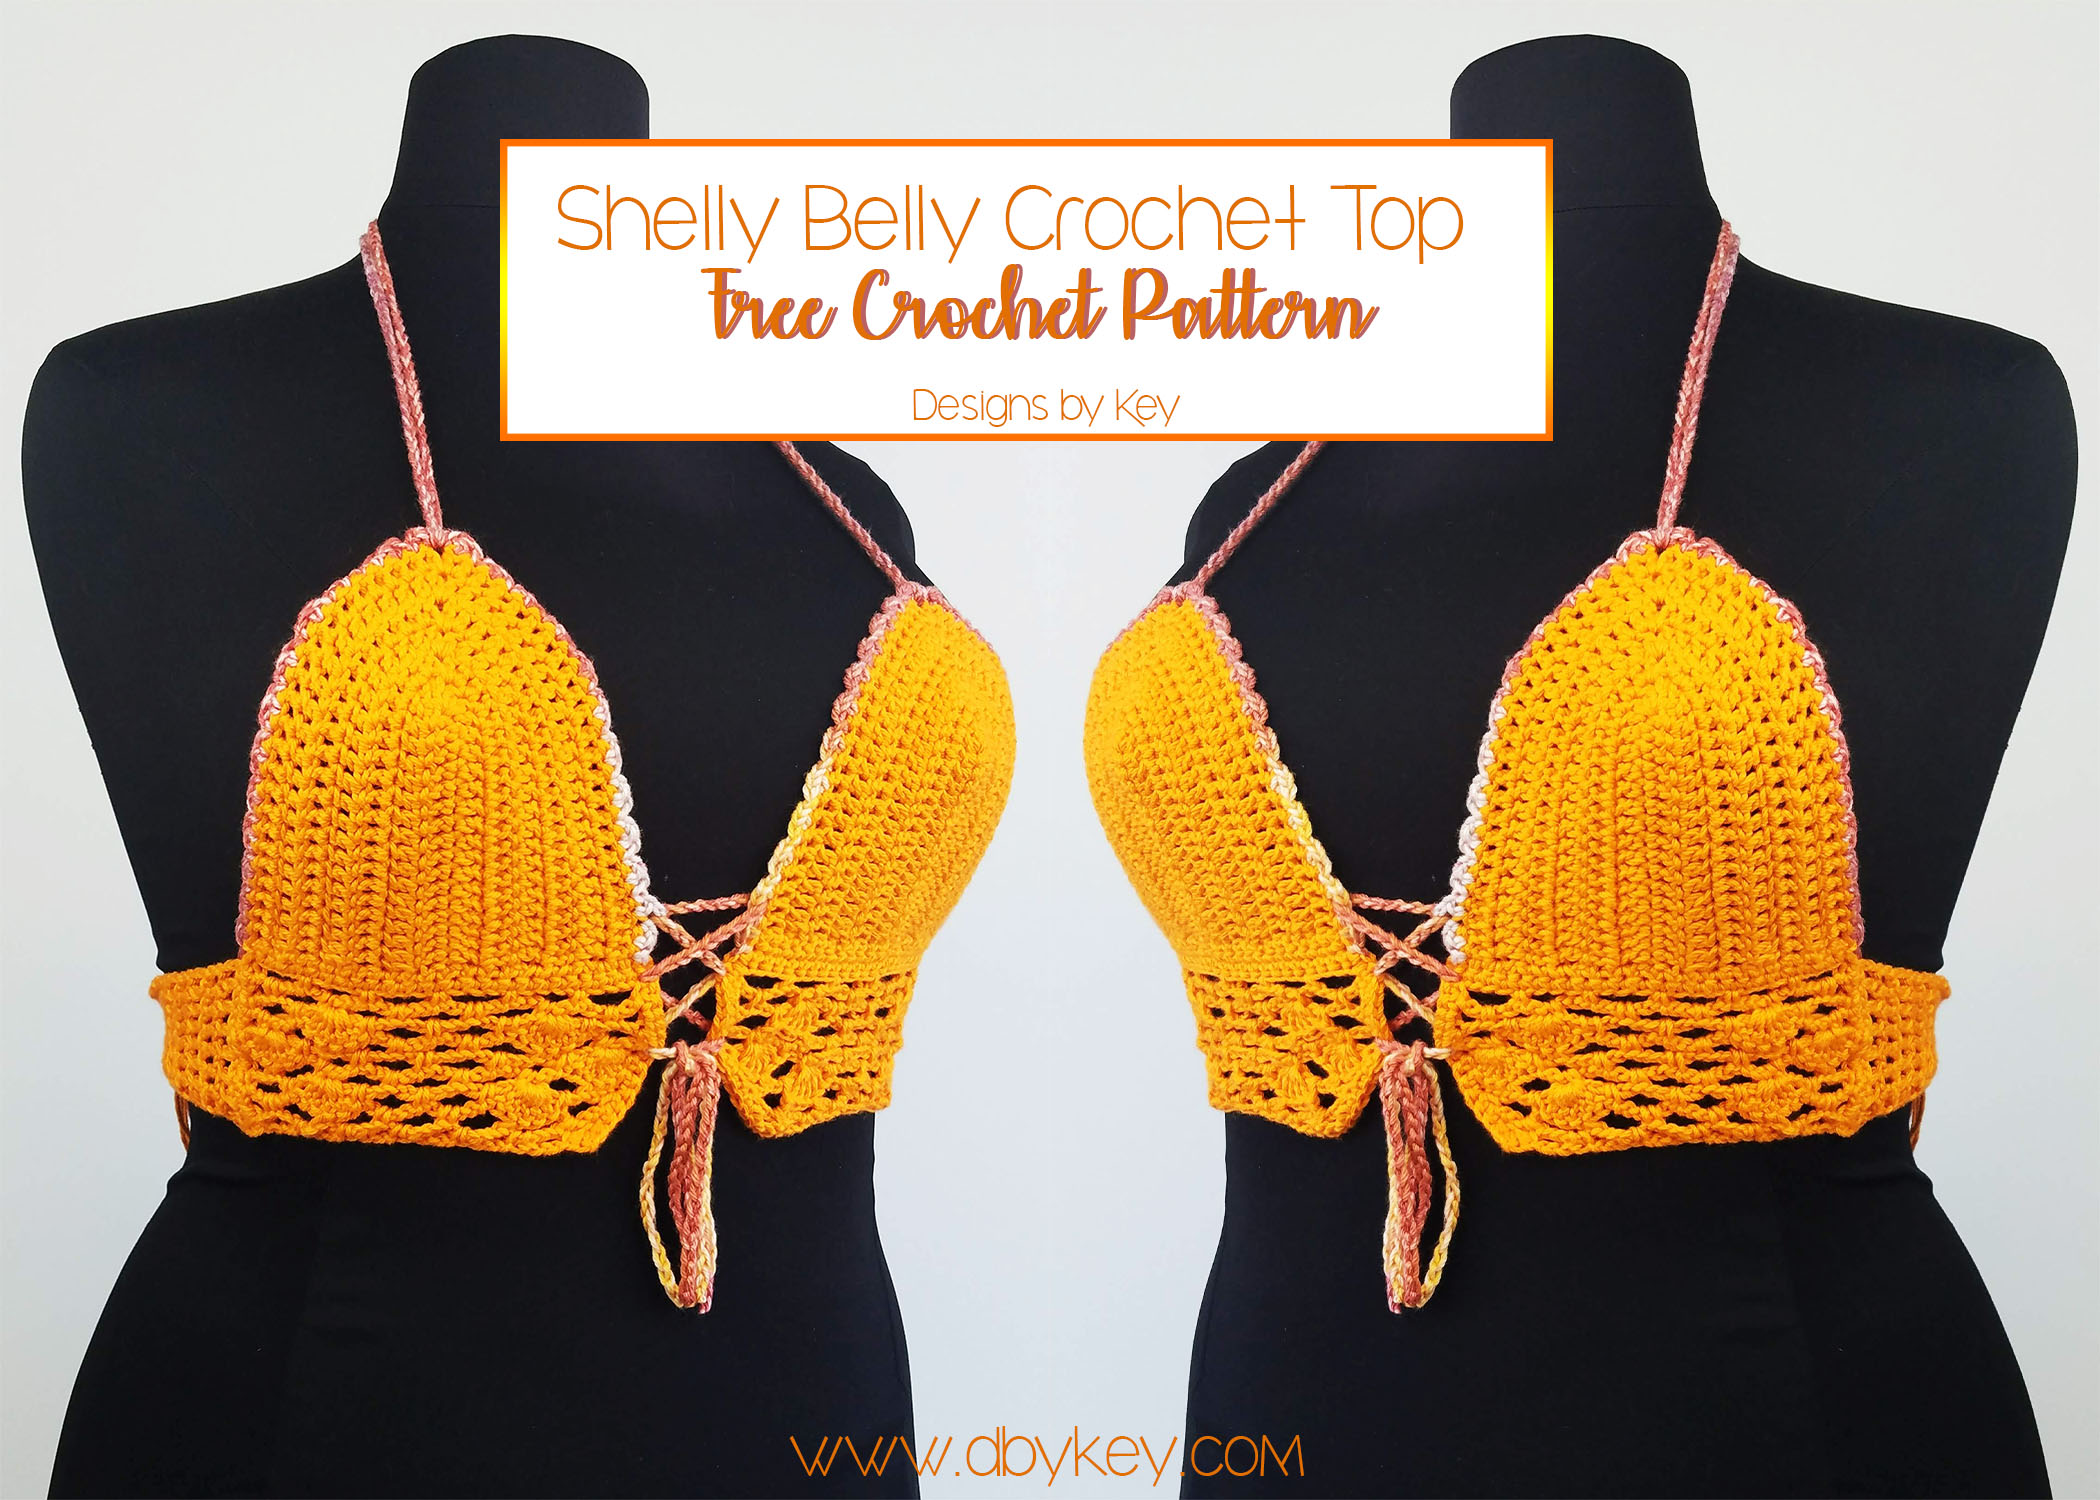
The Shelly Belly Crochet Bikini Top

Y’all. I made another summer crochet top thing that I think you’d like! So I’m sort of new to this bikini top pattern making, but I must say…..ba da ba ba BAAAAH…you know the rest.
I’m sitting here trying to think of something clever to say about how this pattern came along and yeah…..nothing yet, so here’s the truth. I’m from Georgia, it’s hot, summer starts in like 3 weeks, I want to be hot and CUTE, and I want you guys to be cute with me. So yeah….more about this top.
I wanted this crochet bikini top to be pretty basic, but also fully customizable to make it more fun. The pattern is worked one cup at a time, tied together in the middle and the back for as little or as much coverage as you want. It can be worked in multiple colors or just one, you decide. Ya’ll know my favorite yarn is “I Love This Cotton” by Hobby Lobby Stores, but as always any cotton yarn will be just fine. I also love 24/7 100% Cotton Yarn by Lion Brand and I have some on the way to my house as I type!
Oh yeah, I just got a new set of crochet hooks from Amazon and you guys I am amazed! I’ve been having some elbow pain lately while crocheting so I decided to treat myself to some new hooks and they make all the difference. I highly recommend them if you struggle with any type of pain while crocheting.
I would say this pattern is for advanced beginners to intermediate crocheters, but I try to be as detailed as possible and I’m ALWAYS here to help! This pattern utilizes the shell mesh stitch pattern. If you get confused or need more help with the body portion of this top, click here to see the tutorial for the shell mesh stitch pattern.
Okay, let’s jump into it!
*This post contains affiliate links meaning I receive a small commission, at no extra cost to you, when you purchase items through these links. This helps fund my expensive yarn habit and will allow me to keep providing free patterns for you all.*
Materials
E/3.5 MM hook
100% Cotton Yarn (Sample made with I Love This Cotton by Hobby Lobby Stores)
Scissors
Needle for weaving
The Pattern
- Get the ad-free, large print, printable PDF pattern click here or scroll down for the free pattern!
Cups
Make a slip knot, Ch 17
Row 1: DC in the 3rd chain from the hook. DC across the row (15 DC)
Row 2: Ch 2 (does not count as a stitch) and turn, DC in every st across row.
After working the last stitch, rotate work to begin working into the turning chain from the previous row.
(2 DC, Ch 1, 2 DC) into the turning ch sp.
Rotate work again to begin working on the bottom of row 1.
DC across row. (Be sure there are the same amount of sts on both sides of the Ch 1.)
Row 3: Ch 2 and turn ; 1 DC in every st until reaching the Ch 1 sp ; (1 DC, Ch 1, 1DC) into the Ch 1 sp ; 1 DC in each of the remaining sts.


Row 4-8: Repeat Row 3

DO NOT FASTEN OFF. CONTINUE TO BODY.
Body
Rotate to begin working across the bottom of the cup
Row 1: Ch 1 ; SC 25 across bottom of cup working last sc into the first DC of Row 8 on the cup.
Row 2: Ch 1 and turn ; SC in each st across (25 SC)


Row 3: Ch 1 and turn ; 1 SC in 1st st ; *Ch 5, Sk 3 sts, SC in next st* ; Repeat from * to * until end of row.
Row 4: Ch 5 and turn ; 1 SC into the 1st ch sp ; *Ch 5, 1 SC into the next ch sp* ; Repeat from * to * until SC has been worked into the last ch sp ; Ch 2, 1 DC into the SC at the beginning of previous row.


Row 5: Ch 1 and turn ; 1 SC into the 1st DC ; Sk Ch 2 sp, Ch 5, 1 SC into the next ch sp ; 5 DC into the next SC ; 1 SC into the next ch sp ; (Ch 5, sc in next ch sp) 2 times ; 5 DC into the next st ; 1 SC in next ch sp ; Ch 5, SC in 3rd ch of ch 5 at beginning of previous row.


Row 6: Ch 5 and turn; 1 SC in 1st ch sp ; Ch 5, SK (1 SC, 2 DC) ; 1 SC in next DC ; (Ch 5, SC in next ch sp) 2 times ; Ch 5, SK (1 SC, 2 DC) ; 1 SC in next DC ; Ch 5, 1 SC in next ch sp ; Ch 2, 1 DC in SC at beginning of previous row.
Row 7: Ch 1 and turn ; 1 SC in 1st DC ; Sk Ch 2 sp, 5 DC in next SC, 1 SC in next ch sp ; (Ch 5, 1 SC in next ch sp) 4 times ; Ch 5, Sk ch 2 sp ; 5 DC in next SC ; 2 SC into 3rd ch of ch 5 at beginning of previous row.
Row 8: Ch 5 and turn ; SK (1 SC, 2DC) ; Sc into the next DC ; (Ch 5, SC into the next ch sp) 4 times ; Ch 5, SK (1 SC, 2 DC) ; SC in next DC ; Ch 2, 1 DC into the SC at the beginning of previous row.


Row 9: Repeat Row 5
Row 10: Repeat Row 6
Row 11: Ch 1 and turn ; 1 SC into 1st DC ; SK ch 2 sp, *Ch 3, 1 SC into next ch sp* ; Repeat from * to * until the end ; 1 SC into 3rd of ch 5 at beginning of previous row.

Turn work to begin working on side.
Row 12: Ch 1, Work 15 SC up the side of your work being sure to only work into the body.

Cup Trim
Row 12 con’t: Sl st into 1st st on cup ; Ch 1, 1 HDC in next st, ch 1, sl st in next st ; Ch 3, SK next st, HDC into next st ; Ch 1, sl st in next st, ch 1, HDC in next st, ch 1, sl st in next st; Ch 3, SK next st, HDC in next ; *Ch 1, sl st in next, ch 1, HDC in next st.* ; Repeat from *to* until reaching Ch 1 sp at the top of the cup ; Sl st into the ch 1 sp ; Repeat from * to * until reaching the end of cup ; Ch 1, work 15 SC down the other side of body.


Back Mesh
Row 13: Ch 4 and turn (counts as DC and Ch 1), SK next SC, DC in the next st ; *Ch 1, SK next st, DC into the next st.* ; Repeat from * to * until end. (7 boxes)

Rows 14-20: Ch 4 and turn, DC in next st ; *Ch 1, DC in next st.* ; Repeat from * to * until end, working last DC into the 3rd ch of ch 4 at the beginning of previous row.


Fasten off.

Make 2 of the cups. Once the cups are made, continue the pattern.
Straps
Once both cups are made it’s time to make the straps that hold everything together. It is totally up to you how you want to lace your top up, it gives the top a unique look every time.
You will need 4 straps in total.
- 2 straps to tie around the neck
- 1 strap to lace up the middle, and hold the cups together
- 1 strap to hold the back together.
You can make your straps as long or as short as you would like them to be. Be sure that the back strap is long enough to lace up the back of the top and also have enough left to tie securely.
For the neck straps, make a chain long enough that when folded in half it is still long enough to tie around your neck.
Every person is a little different so the number for the straps will vary.
Once everything is tied together and those ends are weaved in, You’re all done!

HAPPY HOOKING!
I would absolutely love to see your how your project turned out! Share your finished work with me on Instagram!
@designsbykey
#dbkeypatterns